Intervallic Playing
This lesson is focused on taking your playing to a higher level. This lesson has a lot of theory involved and requires you have a strong knowledge of intervals and how to play them on the fretboard.
We have been speaking a lot about intervals and the theory behind them, but how does it translate to the fret board and more importantly how can we play them?
We have looked at the minor pentatonic and the way that it can broken up in to shapes. This can be very useful when remembering where and what shape to play, but this can be incredibly restricting. The main reason this can be restricting is due to the ‘boxing’ of the shape, where players will stick to one shape, play lines around that shape, and never branch into other shapes. This sounds dull compared to playing in all over the fret board (also playing up and down the neck looks so much better!) and using intervals as a way to navigate as it opens up another level of playing and gives the player so much freedom!
Not only does intervallic playing make your solos easier to play, but it can help you shape chords all over the fret board using different voicings (playing a chord in another position with different orders of intervals) which can change a song’s feel and make the songs much more exciting.
These are both seriously useful things to learn for future playing, as it will give you a clearer way to visualise playing, give you many more options when soloing/changing chords, and will make future concepts much easier to understand. However, this method will take time, so patience is key! I would recommend going over some of these techniques/exercises for around 10 minutes before you play so your mind will understand where and what notes you are playing. This small amount of time before you play will help you massively in a few months’ time as the note names will feel like natural.
In earlier lessons we have spoken about how triadic chords are made using the Root, Major 3rd, and Perfect 5th.For intervallic playing we will be using the interval of a Minor 7th also. We will be using the same notes as our “Anchor” notes for intervals and intervallic playing. If we remember these 4 intervals and their distances on the fret board, we can then move a tone/semi-tone up or down on the fret board and play the ones in the middle.
So we know what note’s we’re going to play, so let’s apply them to the fret board. We’ll start with the root note. For our demonstrations we will use the Key of E.

Now it may look like a lot of random notes to remember but there are a few tricks. Firstly, there is only one note on each string. The diagram shows 2 on the low and high E strings, but the notes they are playing are just octave notes. So the root note is featured on every string. There are a few ways you can navigate just through the root notes as there are patterns between some of the strings. When we spoke about power chords, we mentioned that some players will add the octave. We can use this information when playing the root notes on the neck. The diagram below shows how we can apply this knowledge and what strings we can apply it to. Side note: This only applies to the Low E and A strings.

By using this way of finding notes, we identify where all of the notes are on the E, A, D, and G strings. We now need to find the notes on the B string only. To do this, there is only 1 of 2 shapes you need to know.
[put extra shape In here]
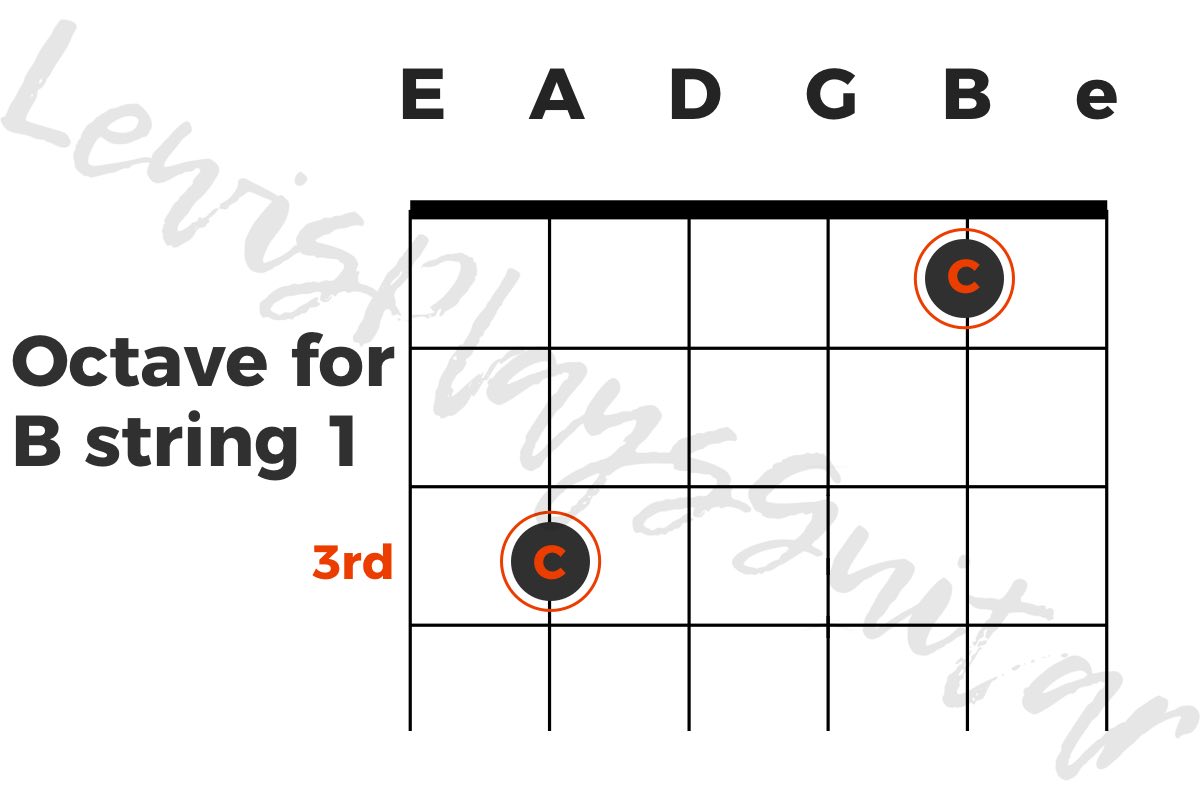

This will now help us identify the same note over all of the strings and help push us out of the restriction between boxes. I would suggest getting familiar with the shapes and identifying the same note on the fret board as this will help when discussing 5ths, 3rds, and 7ths. To practice this, choose any note in western music (A to G#) and play all 6 notes over all of the strings. Once you can do this under 6 seconds over all of the notes, then you will be ready to face the 5ths!
5ths
So we understand how the root notes work and their placement over the fret board. We can use this information to highlight where the 5ths are. Below is a diagram for where the 5ths in relation to the root note.

You might notice a pattern between the patterns. There are 2 main shapes that change when they come across the B string. A good way to remember them is to familiarise yourself with the Roots, the use shapes above and move the notes on the B string up by a semi-tone. You can see how these patterns connect across the fret board below.

I would suggest doing a similar exercise to the roots that we practiced earlier. I would Choose a key, highlight the root notes, then hit all the 5ths within that key. Repeat this for 10 minutes a day before your practice for about a week and you should be more than comfortable with roots and 5ths. Once you can identify the positions fluently and without hesitation, you will be ready for 3rds!
3rds
So right now, we know 2/7ths of the intervals in a major scale. These intervals are incredibly popular amongst most scales, and we use these as “Anchor” notes so we can find other intervals from those. Right now we know where all the Root notes are and where the 5ths are. We will now be applying this knowledge to find where the 3rds are. So if we take the note B in the key of E, (the 5th of the key) and take that note down 3 semi-tones, we will arrive at the Major 3rd interval. We could go down one semi-tone further to get a Minor 3rd. This is the basic concept of using “Anchor” notes which will be essential when finding the 2nd, 4th, and 6th (9th, 11th, 13th) intervals.
We will need to make the 3rd as memorable as the Root and the 5thintervals we know, so we will be using patterns and shapes (similar to the 5th intervals) to help find where the 3rd intervals are. The shapes I will show you are going to the Major 3rd interval, but the major 3rdinterval can be lowered a semi-tone to achieve a minor 3rd instead.

Now as we know the 3rd shapes, we can travel up and down the neck of the guitar with the Root, 3rd, and 5th intervals. When playing these notes over the fret board, highlight what they are by saying the interval/note out loud as you play it. This will keep your brain active when playing and help you identify where you are at all times. This is an effective techniques as you will need to thing where you’re going and what you’re playing.
Finally, we will be familiarising ourself with the 7th interval. Online the 3rds and 5ths there is no pattern to follow, but a very easy rule. Keep in mind that the 7th is very close to the root. Knowing this, we could drop down 1 or 2 frets depending on what quality we want the 7th to be. Drop 1 fret for Major, and 2 for Minor. The diagram below shows this on the fretboard for the Minor 7ths. If all of the purple notes were to go up a fret, we would have all Major 7ths.

It’s important to note that when we create chords using intervals, that if a Root not and a Major 7th are played in the same octave, they may create tension. When playing chords, the Root and Major 7th intervals will often be an octave apart for that reason, however you can use the tension for songs to make it interesting!
This exercise is crucial to intervallic playing, so spend plenty of time on it. I would suggest spending around a month with this exercise by setting aside 15 minutes before your practice, and thinking about the concept whilst you are playing. For instance, if you are rehearsing different voicings for chords, look at what the intervals are and the order they are in. How else could those chord be played? This type of thinking will help you solo in the future and pick out certain tones that you want to highlight, for instance, if you want a ‘sad’ melody, you would target the minor 3rd, minor 6th, and minor 7th. Knowing where these notes are will make your playing much more flexible and expressive!
This will take a bit of time to remember and play fluently so take your time with it. Start off but exercising for 10 minutes everyday with just the root notes, and when you can play them with no visual help across most keys, then you can move on to the 5ths and repeat the process. It will take a bit of time now but will save you hours and days in the future!